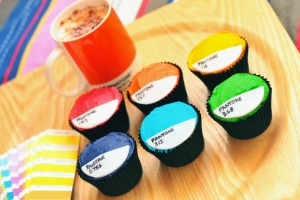
I made these cupcakes for a Pantone-obsessed friend that has just moved to a new city.
In order to get the vivid colours, I recommend using Sugarflair paste colours, which are available from specialist cake decorating shops (or online). Alternatively, look at using Wilton icing paste colours, which are more widely available (Hobbycraft etc). Don’t be put off by the initial expense of the colours – they’re highly concentrated, so a small tub will last ages. I’ve used the full spectrum, but if you’re making these for a party or wedding, they can be coloured to suit the theme.
The recipe is adapted from Hummingbird Bakery’s vanilla cupcake recipe. Be warned – they’re loaded with sugar and colouring – so probably best for birthdays or special occasions!
Makes 12 – 16 cupcakes. Can be stored in a cool, dry place for around three days (don’t store in the fridge, as this can cause the colours to run).
Ingredients
80g unsalted butter
280g caster sugar
240g plain flour
1 tbsp baking powder
0.25 tsp salt
240ml full fat milk
1 tsp vanilla essence
2 free range eggs
Decorating ingredients
500g icing sugar
160g unsalted butter (soft)
50ml full fat milk
1 tsp vanilla essence
Paste colours (a mix of colours to suit your theme)
100g fondant icing (Regal Ice)
Black food colouring pen
Method
1. Preheat oven to 190 degrees, and line muffin tin with cases.
2. Place the butter, sugar, flour, baking powder and salt in to a large bowl, and mix to the consistency of breadcrumbs (ideally with a freestanding mixer, however a handheld mixer, or a wooden spoon with plenty of elbow grease will work too).
3. In a separate jug, beat eggs together, and add milk and vanilla essence.
4. Pour the wet ingredients in to the dry ingredients, and mix until combined. Don’t overwork the mixture, but make sure all dry ingredients are incorporated.
5. Pour batter in to cases, to around two thirds full, and bake for 18 – 20 minutes (or until golden, and they bounce back when pressed).
6. Allow to cool, and then trim any peaks so that the tops are level.
Buttercream frosting
1. In a large bowl (or the bowl of a freestanding mixer), beat the butter until soft and fluffy.
2. Add half of the icing sugar, and mix in using a wooden spoon. Then, add remaining icing sugar and mix in with a wooden spoon.
3. Add milk and vanilla essence, and combine.
4. With an electric mixer, mix on a medium-high speed until light and fluffy (around 5 minutes).
5. Divide the butter cream in to separate bowls for each colour you intend to use.
6. Insert a clean cocktail stick in to the paste colour tub to pick up some colouring, and swirl in to your buttercream. Mix the colouring well. Add more if the colour isn’t vivid enough, however bear in mind that the colour will deepen on standing.
7. Repeat step 6 for each individual colour.
Fondant circles
1. Roll out the fondant icing, to around 2mm thick.
2. Cut in to an inch wide strip.
3. With a plain circular cookie cutter, cut 12 – 16 semi circles from this strip (try to find a cookie cutter with a diameter that matches the surface of your cakes).
4. Allow the strips to harden up for around half an hour in a warm room (this will make it much easier to write on the surface).
4. Use the food colouring pen to add text to each semi circle. I used an online Pantone chart to roughly match the colours to the icing.
Assembly
1. Add a generous dollop of frosting to the top of each cupcake, smooth using a small offset palette knife, and place the fondant decoration on the top.
