Pantone Cupcakes

20130206-191916.jpg

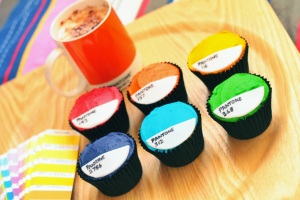
I made these cupcakes for a Pantone-obsessed friend that has just moved to a new city.

In order to get the vivid colours, I recommend using Sugarflair paste colours, which are available from specialist cake decorating shops (or online). Alternatively, look at using Wilton icing paste colours, which are more widely available (Hobbycraft etc). Don’t be put off by the initial expense of the colours – they’re highly concentrated, so a small tub will last ages. I’ve used the full spectrum, but if you’re making these for a party or wedding, they can be coloured to suit the theme.

The recipe is adapted from Hummingbird Bakery’s vanilla cupcake recipe. Be warned – they’re loaded with sugar and colouring – so probably best for birthdays or special occasions!

Makes 12 – 16 cupcakes. Can be stored in a cool, dry place for around three days (don’t store in the fridge, as this can cause the colours to run).

Ingredients

80g unsalted butter
280g caster sugar
240g plain flour
1 tbsp baking powder
0.25 tsp salt
240ml full fat milk
1 tsp vanilla essence
2 free range eggs

Decorating ingredients

500g icing sugar
160g unsalted butter (soft)
50ml full fat milk
1 tsp vanilla essence
Paste colours (a mix of colours to suit your theme)
100g fondant icing (Regal Ice)
Black food colouring pen

Method

1. Preheat oven to 190 degrees, and line muffin tin with cases.
2. Place the butter, sugar, flour, baking powder and salt in to a large bowl, and mix to the consistency of breadcrumbs (ideally with a freestanding mixer, however a handheld mixer, or a wooden spoon with plenty of elbow grease will work too).
3. In a separate jug, beat eggs together, and add milk and vanilla essence.
4. Pour the wet ingredients in to the dry ingredients, and mix until combined. Don’t overwork the mixture, but make sure all dry ingredients are incorporated.
5. Pour batter in to cases, to around two thirds full, and bake for 18 – 20 minutes (or until golden, and they bounce back when pressed).
6. Allow to cool, and then trim any peaks so that the tops are level.

Buttercream frosting

1. In a large bowl (or the bowl of a freestanding mixer), beat the butter until soft and fluffy.
2. Add half of the icing sugar, and mix in using a wooden spoon. Then, add remaining icing sugar and mix in with a wooden spoon.
3. Add milk and vanilla essence, and combine.
4. With an electric mixer, mix on a medium-high speed until light and fluffy (around 5 minutes).
5. Divide the butter cream in to separate bowls for each colour you intend to use.
6. Insert a clean cocktail stick in to the paste colour tub to pick up some colouring, and swirl in to your buttercream. Mix the colouring well. Add more if the colour isn’t vivid enough, however bear in mind that the colour will deepen on standing.
7. Repeat step 6 for each individual colour.

Fondant circles

1. Roll out the fondant icing, to around 2mm thick.
2. Cut in to an inch wide strip.
3. With a plain circular cookie cutter, cut 12 – 16 semi circles from this strip (try to find a cookie cutter with a diameter that matches the surface of your cakes).
4. Allow the strips to harden up for around half an hour in a warm room (this will make it much easier to write on the surface).
4. Use the food colouring pen to add text to each semi circle. I used an online Pantone chart to roughly match the colours to the icing.

Assembly

1. Add a generous dollop of frosting to the top of each cupcake, smooth using a small offset palette knife, and place the fondant decoration on the top.
Hummingbird Cupcakes

20130206-194551.jpg

It’s February. January’s over, but it’s still the middle of winter, and I’m sure most of us are still feeling the effects of over-spending at Christmas. These cupcakes are a summery combination of pineapple, bananas, coconut and walnuts, and are perfect for conjuring up happy, sunshine memories.

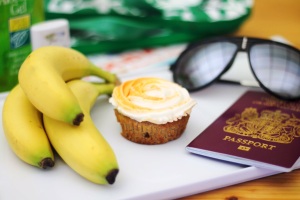
This is ideal decorated with cream cheese frosting – however as you can see in my photo, this doesn’t pipe very well! Probably best slathered on nice and thick with a palette knife.

This is traditionally a layer cake, and is American in origin, so I’ve taken a few recipes and merged them in to cupcakes, converting to UK measurements along the way. The name relates to the sweetness of the cake rather than London’s famous Hummingbird Bakery.

Makes 12 – 16 large (American style) cupcakes, or 20 – 24 standard (UK) cupcakes.

Ingredients

160g plain flour
1.5 tsp baking powder
1 tsp cinnamon
0.25 tsp freshly grated nutmeg
0.25 tsp salt
113g unsalted butter
200g caster sugar
2 large eggs (free range)
3 large bananas, mashed (if they’re not ripe, microwave for 30 seconds to bring out the flavour)
1 tbsp honey
120g walnuts
227g tin crushed pineapple (don’t strain the juice)
60ml hot water
35g desiccated coconut

Frosting ingredients

200g unsalted butter
200g cream cheese (strain any water sitting on top)
440g icing sugar

Method

1. Preheat the oven to 180 degrees, line muffin tin with cases.
2. Sieve together flour, baking powder, cinnamon, nutmeg and salt, and set aside.
3. Beat butter in stand mixer until fluffy. Add sugar, and cream until well-combined (2 – 3 minutes).
4. Add eggs, one at a time, and beat well. Add banana and honey, and beat to combine, and repeat for pineapple, and again for walnuts and coconut.
5. Add a third of the flour mix, and a third of the hot water. Mix to combine, and repeat twice with the remaining flour and water.
6. Fill each case to roughly three quarters full (this is quite a dense cake, so they don’t rise much – similar in texture to carrot cake).
7. Cool, and decorate with cream cheese frosting.

Cream cheese frosting

1. Beat softened butter with cream cheese until smooth and light.
2. Stir in icing sugar until combined, and then beat until light and smooth (this should take around five minutes, be careful not to overbeat as this will cause the frosting to become runny).

Viennese Whirls

20130206-194816.jpg

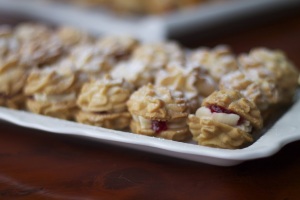
Viennese whirls are very popular with afternoon tea, however most Brits are only familiar with Mr Kipling’s version – and whilst they are exceedingly good, they’re even better homemade! I like to use Lakeland’s silicon macaron moulds for baking these – they have a slight lip which keeps the biscuits from spreading too far. This helps when sandwiching the biscuits, as the bases are all uniform.

This is a miniature version, based on The Hairy Bikers’ recipe.

Makes around 20 – 24 x 1.5″ sandwiched biscuits. Can be stored in the biscuit tin (not refrigerated) for around 3 days.

Ingredients

250g very soft butter
50g icing sugar, and extra to dust
250g plain flour
50g cornflour
1 tsp vanilla extract

Buttercream ingredients

100g butter, room temperature
200g icing sugar
1 tsp vanilla extract
100g seedless raspberry jam

Method

1. Preheat the oven to 190 degrees, and line baking sheet with greaseproof paper. If using silicon moulds, there’s no need to grease for this recipe.

2. With a food processor, blitz the butter, icing sugar, flour, cornflour and vanilla extract until a smooth paste forms.

3. Prepare a piping bag (ideally strong and disposable) with an open star nozzle (a Wilton 1M is ideal for this). Transfer your dough to the piping bag, and knead the bag gently until the dough is soft enough to pipe (the warmth from your hands should loosen the buttery mixture).

4. Pipe (ideally in to rosettes, but randomly piped mountains also look quite attractive when baked!).

5. Bake for 10 – 12 minutes, or until golden. Cool on the tray until cool enough to handle, and transfer to a cooling rack.

6. To make the buttercream filling, place the butter in a stand mixer and mix until soft.

7. Add the icing sugar and and vanilla extract. To prevent icing sugar covering every surface in the kitchen, either initally mix it in with a wooden spoon until the powder has been absorbed, or cover the mixer with a large clean tea towel. Whip the buttercream (using the paddle attachment) until light, soft and fluffy. This will take around five minutes. Place the buttercream in to a piping bag fitted with a 1cm plain nozzle.

8. Place the jam in to a saucepan over a low heat for a few minutes to loosen up. Then, transfer to a piping bottle (though don’t worry if you don’t have a piping bottle – you can use a teaspoon when assembling later instead). Be careful at this stage – if left for too long over the heat, the jam is likely to be very hot.

9. Sort your biscuits in to pairs – the top and bottom should be roughly equal sizes.

10. Pipe a circle of buttercream on to the bottom biscuit, and top this with a smaller circle of jam. Then, gently push on the top biscuit, so that the filling pushes out to the edges.

11. Repeat with remaining biscuits, and sprinkle with a light dusting of icing sugar.